The aim of this tutorial is to demonstrate how to set up headless SWTBot test for the RCP mail application. I am no expert in this, but I thought it might be useful to provide a set of instructions using an example that everyone can access, at least to get a working example to begin with. To be able to follow this tutorial it is best if
- You have some experience using SWTBot in the Eclipse IDE
- You have some knowledge of Ant builds and Eclipse PDE builds.
This tutorial is based on input from several sources : from Ralf Ebert's tutorial blog on p2 builds , from Kai Toedter's mp3 client demo RCP app , and Ketan Padegaonkar's SWTBot tutorial at EclipseCon 2010 and the SWTBot wiki pages.
The main steps in this tutorial are
- Create an RCP mail application and feature.
- Develop a headless build for the RCP mail app.
- Develop an SWTBot based test plugin to test the UI of the mail app
- Develop a headless build and execution of the SWTBot tests.
Set up:
This tutorial is set up using Eclipse 3.5.2. You will need two copies of Eclipse, one as your IDE and one as a target to compile against. The target should contain the RCP delta pack , and the full PDE feature set. Both Eclipses should have SWTBot installed (best done through the update site). This tutorial uses Galileo, I've not checked with Helios or Ganymede if this works. The Galileo update site is available at http://download.eclipse.org/technology/swtbot/galileo/dev-build/update-site.
All the projects are available in zipped workspace here
Step 1 : Create RCP mail application:
This takes several stages: create the RCP app, create a product, create a feature,
and do an export build using features.
a ) Create RCP app
Switch to a clean empty workspace
- Set your target Eclipse to be the Eclipse into which you've installed the RCP delta pack.
- Create a new plugin project called 'mail'. Make sure you have chosen that it is an RCP application(Pic).
- Choose 'RCP Mail Template' as the example template. Otherwise accept all defaults.

CHECKPOINT :Select the newly created mail project, right-click Run As-> Eclipse Application - it should run!
b) Create a product file
Now we're going to create a product file for our mail application.
Select the mail project, right-click and choose 'New Product Configuration' and in the ensuing dialog call the product file 'mail.product' . Click Finish.

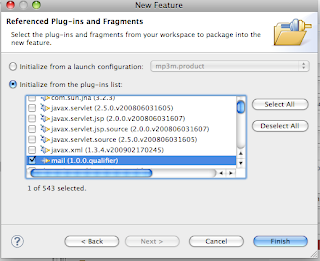
c) Now we're going to create a feature for the mail project. Click New->Feature Project,
call it 'mail.feature' and in the subsequent page add the 'mail' plugin (Picture below). Click Finish.
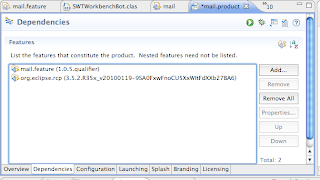
d). Now, go back to the product configuration file you created in step b) and open it in the the Product editor. In the overview tab, change the 'This project configuration is based on:' from plugins to features. Now click on the dependencies tab and add the following 2 features
- org.eclipse.rcp
- mail.feature
CHECKPOINT:
Go back to the overview tab, click 'Synchronize with defining plugin', and 'Launch an Eclipse app' - it should still run! At this stage you can try a product export from the overview page; just accept the defaults and you should get an exported functional RCP app.
So, at this stage we have a product configuration that has all the required functionality to export a working RCP mail application.
Step 2 Creating a headless ant build for the mail client:
First of all, create project 'mail build' and copy in these 2 files:
build.properties
build.xml.
To get the headless build to work on your machine, you will need to edit some file paths and platform specific settings in 'build.properties'. These are documented at the start of the file.
Build.xml can remain unchanged.
Checkpoint: you can now run the 'Build from workspace' ant target and get a build generated into a folder called user.home/MailBuilds/Builds/I.RCPMail. Unzip the archive and check the application runs.
Step 3: Now we'll finally get round to working with SWTBot!!
Create a new, standard plugin project called 'testMail'. Add the following plugins to the list of required plugins in the 'Dependencies' section:
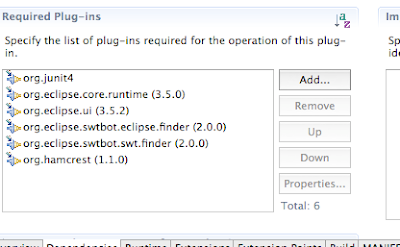
org.junit4
org.eclipse.swtbot.eclipse.finder
org.eclipse.swtbot.swt.finder
org.hamcrest
Now create a testcase called MailApplicationTest in package 'test' with some SWTBot tests; here is a sample below:
package test;

import static org.junit.Assert.assertEquals;
import static org.junit.Assert.assertNotNull;

import java.util.List;

import org.eclipse.swtbot.eclipse.finder.SWTWorkbenchBot;
import org.eclipse.swtbot.eclipse.finder.matchers.WidgetMatcherFactory;
import org.eclipse.swtbot.eclipse.finder.widgets.SWTBotView;
import org.eclipse.swtbot.swt.finder.SWTBot;
import org.eclipse.swtbot.swt.finder.widgets.SWTBotMenu;
import org.eclipse.swtbot.swt.finder.widgets.SWTBotShell;
import org.junit.Test;

public class MailApplicationTest {

private SWTWorkbenchBot bot=new SWTWorkbenchBot();

@Test
public void testApplicationWindow ()throws Exception{
assertNotNull(bot.shell("RCP Product"));
}

@Test
public void testOpenAnotherView ()throws Exception{
SWTBotMenu file = bot.menu("File").menu("Open Another Message View");
file.click();
List views = bot.views(WidgetMatcherFactory.withPartName("Message"));
assertEquals(2, views.size());
views.get(1).close();
}

@Test
public void testOpenMessage ()throws Exception{
SWTBotMenu file = bot.menu("File").menu("Open Message");
file.click();
bot.shell("Open").bot().button("OK").click();
}

@Test
public void testClickMessageLink ()throws Exception{
SWTBot viewBot = bot.viewByTitle("Message").bot();
viewBot.link("nicole@mail.org").click();
SWTBotShell shell = bot.shell("Not Implemented");
shell.bot().button("OK").click();
}

@Test
public void testNavigationView ()throws Exception{
SWTBot viewBot = bot.viewById("mail.navigationView").bot();
String node = viewBot.tree().expandNode("me@this.com").getNodes().get(0);
assertEquals(node, "Inbox");
}
}
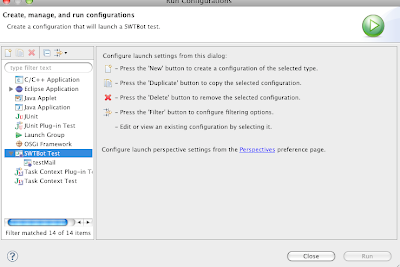
Now check the tests run by configuring a new SWTBot launch configuration:
Choose 'mail.product' as the product to launch. You may need to go into the 'plugins' tab and 'add required plugins' if the app fails to launch.
Below are screenshots needed to get the launch configuration to work:


CHECKPOINT: You can run the SWTBot tests successfully in the IDE, 5 tests should pass.
Step 4 Finally we're ready to run the tests from an Ant script!!
a) First of all create a new 'General' project called 'mail.test.build' and copy into it the build.xml and build.properties from the mail.build project. We'll come back to these later.
b) Now create a feature for your test plugin. Create a new Feature project called 'testMail.feature' and add the testMail SWTBot test plugin as its single component plugin.
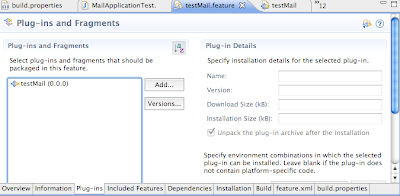
c) In the testMail plugin, create a new product configuration and call the product file 'testMail.product', and make it a feature based product. This product will contain the features needed for the mail app, as well as those needed for SWTBot. The end result is that , when exported, SWTBot and its dependencies will be 'embedded' in the RCP app. So add the following features to the product:
- mail.feature
- org.eclipse.rcp (these were needed for our app)
- testMail.feature (our SWTBot test feature)
- org.eclipse.swtbot
- org.eclipse.swtbot.eclipse
- org.eclipse.swtbot.eclipse.test.junit4 (the swtbot features)
- org.eclipse.pde
- org.eclipse.jdt
- org.eclipse.platform ( dependencies for SWTBot)
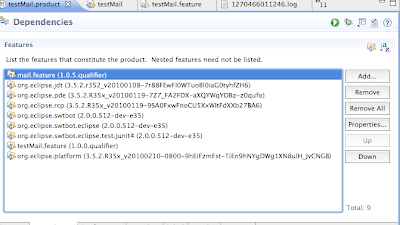
CHECK: In the testMail.product configuration overview tab, following a 'synchronize with product's defining plugin' and launching, the test product should launch. Also, an export of the product should proceed successfully (using the Eclipse product export wizard). At this point we don't need the tests to run, we just want to make sure that the app still runs OK
d) Create a headless build of the SWTBotted- mail application. In the mail.test.build project we created in step a), we just need to make a few alterations so it will build our test project:
In build.properties, change the 'product' property to
product=${buildDirectory}/plugins/testMail/testMail.productIn build. xml, add the lines :
<include name="testMail*/**" />
<exclude name="testMail*.feature*/**" />
<include name="testMail.feature*/**" />
into the copyProjectsFromFilesystem target
so that it looks like this :
<target name="copyProjectsFromFilesystem">
<mkdir dir="${buildDirectory}" />
<mkdir dir="${buildDirectory}/plugins" />
<mkdir dir="${buildDirectory}/features" />
<copy todir="${buildDirectory}/plugins">
<fileset dir="${sourceDir}">
<include name="mail*/**" />
<include name="testMail*/**" />
<exclude name="*mail*.feature*/**" />
<exclude name="testMail*.feature*/**" />
</fileset>
</copy>
<copy todir="${buildDirectory}/features">
<fileset dir="${sourceDir}">
<include name="mail.feature*/**" />
<include name="testMail.feature*/**" />
</fileset>
</copy>
</target>
This just ensures we will include the new test features and plugins in the headless build as well.
The build should just run in the same way as for the standard RCP headless app that we performed in stage 2.
CHECKPOINT: Unzip the build and verify that the exported 'Test' build starts properly.
e) Now invoke the tests using an ant task provided by SWTBot as described in the SWTBot wiki . To begin with you can create
a file called 'SWTBottest.xml' in your IDE eclipse and paste in the content below; in real usage you would probably want this to to merged
in with your standard build and invoked automatically after the build has finished.
This task is provided verbatim here and you will need to edit the property
'eclipse-home' to point to your RCP app install.
You may need to alter some of the other properties, for example those concerning your OS, or the SWTBot build IDs. For the RCP mail application, if you have named the projects and artifacts the same as me, you won't have to alter the plugin-name, classname, testProduct or plugin-name properties.
<project name="testsuite" default="run" basedir=".">

<!-- Edit this to be the path to your exoprted  RCP application -->
<property name="eclipse-home" value="/Users/radams/MailBuilds/BUILDS/I.RCPMail/RCPMail" />

<!-- The SWTBot build ID (look in plugins/ to see if this is different) -->
<property name="all.buildId" value="2.0.0.512-dev-e35" />

<!--  The OS running the tests -->
<property name="os" value="macosx"/>
<property name="ws" value="cocoa"/>
<property name="arch" value="x86"/>

<!-- Edit this to be the name of your test plugin -->
<property name="plugin-name" value="testMail" />
<property name="classname" value="test.MailApplicationTest"/>
<property name="testProduct" value="mail.product"/>
<!-- path to library file  ( which should be included in your RCP app) -->
<property name="library-file" value="${eclipse-home}/plugins/org.eclipse.swtbot.eclipse.junit4.headless_${all.buildId}/library.xml"/>

<!--- Don't need to edit below this point   -->
<target name="suite">

<condition property="jvmOption" value="-XstartOnFirstThread -Dorg.eclipse.swt.internal.carbon.smallFonts">
<os family="mac"/>
</condition>

<property name="jvmOption" value=""></property>

<property name="temp-workspace" value="workspace" />
<delete dir="${temp-workspace}" quiet="true" />

<!-- remove junit3 fragment -->
<delete dir="${eclipse-home}/plugins/org.eclipse.swtbot.eclipse.junit3.headless_${all.buildId}" />
<delete dir="${eclipse-home}/plugins" includes="org.eclipse.swtbot.ant.optional.junit3_${all.buildId}.jar"/>

<ant target="swtbot-test" antfile="${library-file}" dir="${eclipse-home}">
<property name="data-dir" value="${temp-workspace}" />
<property name="testProduct" value="${testProduct}" />
<property name="plugin-name" value="${plugin-name}" />
<property name="classname" value="${classname}" />
<property name="vmargs" value=" -Xms128M -Xmx368M -XX:MaxPermSize=256M ${jvmOption}" />
</ant>
</target>

<target name="cleanup" />

<target name="run" depends="suite,cleanup">
<ant target="collect" antfile="${library-file}" dir="${eclipse-home}">
<property name="includes" value="*.xml" />
<property name="output-file" value="${plugin-name}.xml" />
</ant>
</target>

</project>
Now invoke the build - you should the app fire up and the application respond to the tests. You should now be able to follow the results as described in the Eclipse wiki page on SWTBot.
Summary
In this blog I've tried to give a complete run-through of all the steps needed to get headless SWTBot tests running for an Eclipse RCP. A complete workspace of the projects is available here which hopefully will give interested readers further clarification on details.
Thanks very much for reading - I hope this is of some use.